Kelly's Space
Coding 'n stuff
Yearly Archives: 2012
Deploying multiple web applications to a single Azure instance and applying web.config transforms correctly
MSDN has a good article on configuring a web role for multiple web sites. The downside to this approach is that it doesn’t use project references and msbuild to ensure that each project is built and deployed before packaging. This is because it simply includes the contents of a folder as the content for the virtual directory (or web site). What I needed was a way to ensure that the following conditions were met:
- All web projects are rebuilt when the Azure deployment package is built
- All web.config transforms were executed
- Only the files needed to run the website are included
After some trial and error, I figured it out using the following approach.
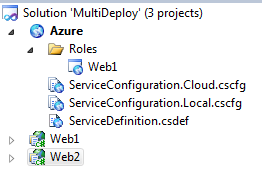
I started with a solution with a single Azure web role project, called Web1, and added an additional web project called Web2:
I’m going to configure the Azure project so that it has a virtual directory called /Web2 for the Web2 project. To do this, I need to edit the ServiceDefinition.csdef file as follows:
<?xml version="1.0" encoding="utf-8"?>
<ServiceDefinition name="Azure"
   xmlns="http://schemas.microsoft.com/ServiceHosting/2008/10/ServiceDefinition">
  <WebRole name="Web1" vmsize="Small">
    <Sites>
      <Site name="Web" physicalDirectory="..\Web1">
        <VirtualApplication name="Web2" physicalDirectory="..\..\..\Publish\Web2" />
        <Bindings>
          <Binding name="Endpoint1" endpointName="Endpoint1" />
        </Bindings>
      </Site>
    </Sites>
    <Endpoints>
      <InputEndpoint name="Endpoint1" protocol="http" port="80" />
    </Endpoints>
    <Imports>
      <Import moduleName="Diagnostics" />
    </Imports>
  </WebRole>
</ServiceDefinition>
The highlighted lines above are the ones that I changed. For the physicalDirectory of Web2, I specified a folder in the parent directory called ..\..\..\Publish\Web2. This folder is going to be created off of the solution root folder during build. To make the Web2 project create this folder and deploy during build, I’ll create a new msbuild target in the project file.
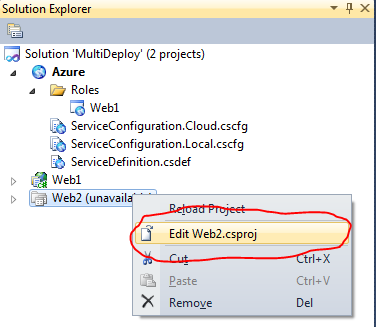
To edit the project file, it must first be unloaded (Right click on Web2 in Solution Explorer, and select Unload Project. Once the project is unloaded, right click on Web2 again, and select Edit Web2.csproj
This will bring up the Web2.csproj file in the editor in Visual Studio. Find the following tag:
<Import Project="$(MSBuildExtensionsPath32)\Microsoft\VisualStudio\v10.0\WebApplications\Microsoft.WebApplication.targets" />
After this tag, add the following target:
  <Target Name="PublishToFileSystem"
          DependsOnTargets="PipelinePreDeployCopyAllFilesToOneFolder">
    <Error Condition="'$(PublishDestination)'==''"
           Text="The PublishDestination property is not set." />
    <MakeDir Condition="!Exists($(PublishDestination))"
             Directories="$(PublishDestination)" />
    <ItemGroup>
      <PublishFiles Include="$(_PackageTempDir)\**\*.*" />
    </ItemGroup>
    <Copy SourceFiles="@(PublishFiles)"
          DestinationFiles="@(PublishFiles->'$(PublishDestination)\%(RecursiveDir)%(Filename)%(Extension)')"
          SkipUnchangedFiles="True" />
  </Target>
Save the file, and reload the project by right clicking on Web2 in Solution Explorer and selecting Load Project.
The last step is to create a prebuild step in the Azure project, so that it builds Web2 with the PublishToFileSystem target. To do this, unload the Azure project in Solution Explorer, and open it up in the editor. Find the following tag:
<Import Project="$(CloudExtensionsDir)Microsoft.WindowsAzure.targets" />
After this tag, add the following :
<Target Name="BeforeBuild">
    <MSBuild Projects="..\Web2\Web2.csproj"
             ContinueOnError="false"
             Targets="PublishToFileSystem"
             Properties="Configuration=$(Configuration);PublishDestination=..\Publish\Web2\;AutoParameterizationWebConfigConnectionStrings=False" />
</Target>
Before the Azure project builds, it will call msbuild on the Web2.csproj project and build the PublishToFileSystem target. It sets the PublishDestination property to the ..\Publish\Web2\ folder that the ServiceDefinition.csdef file referenced.
Save the project file, and reload the Azure project in Visual Studio.
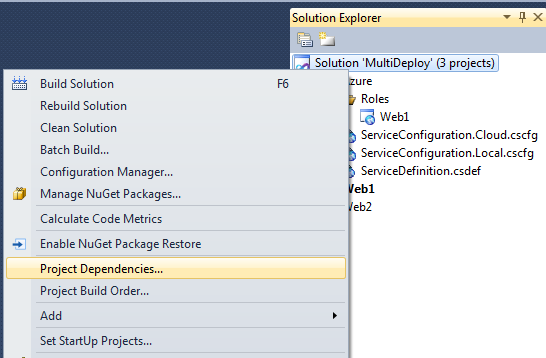
Finally, we need to ensure that the Web2 project gets built before being published. To do this, update the project dependencies so that the Azure project depends on the Web2 project. Right click on the Solution node in Solution explorer, and select Project Dependencies…
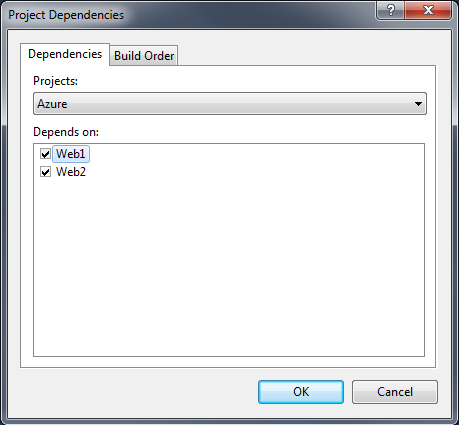
Select Azure from the Projects list, and check Web2 and click OK.
Now, when you right click on the Azure project and select “Package”, it will build and package Web1 as it normally would, and Web2 will be built and packaged as a virtual directory called “Web2”, with config tranforms being applied and only the files needed to run the application included.
Viewing the output window after packaging the Azure project verifies that the config transform were applied:
>------ Build started: Project: Azure, Configuration: Release Any CPU ------
------ Build started: Project: Azure, Configuration: Release Any CPU ------
				Transformed Web.config using Web.Release.config into obj\Release\TransformWebConfig\transformed\Web.config.
				Copying all files to temporary location below for package/publish:
obj\Release\Package\PackageTmp.
You can add as many web sites as you want to a single Azure web role using this method. All you need to do is to add the PublishToFileSystem target to the new web project, and add an additional msbuild task to the BeforeBuild target in the Azure project file. You can download the source use in this sample here (Updated for VS2012). Hope this helps!
